
How to develop in a workshop with VS Code
The Workshop extension for VS Code opens your project inside a workshop while VS Code itself keeps running on the host. It lists the project’s workshops in a side bar, creates new ones, connects the window to a workshop over SSH, and offers to refresh a workshop when its definition changes.
The steps below take a Go project from an empty directory to a server running inside a workshop, then change, break, and repair the workshop’s definition and switch between the host and the workshop.
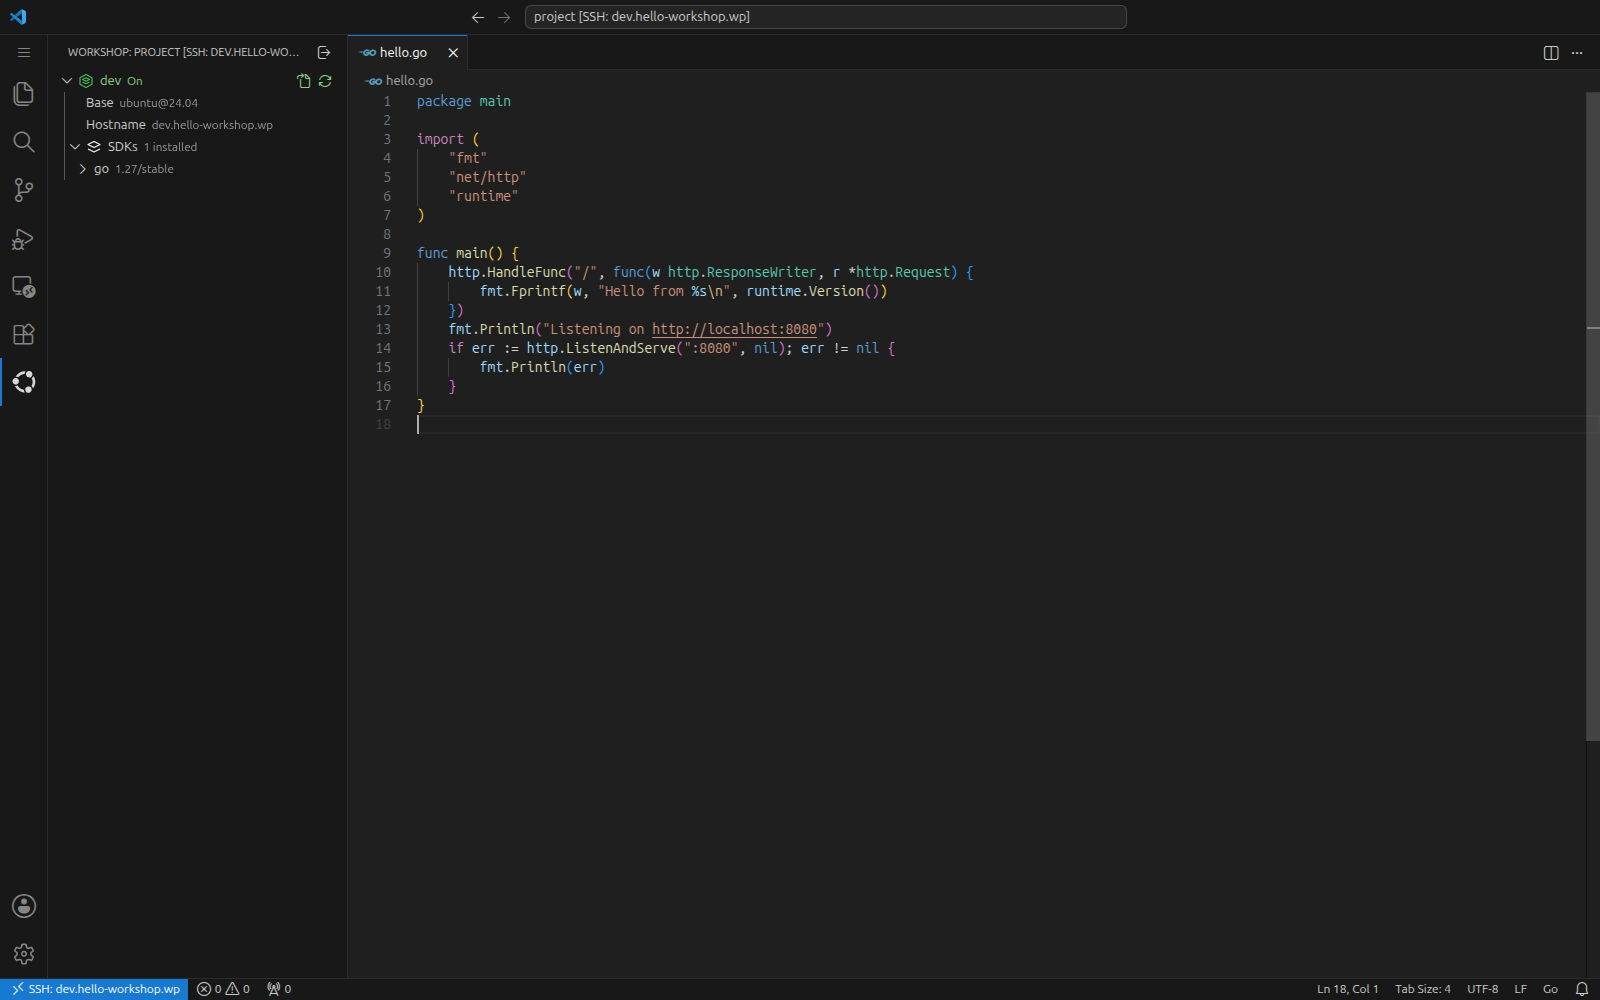
VS Code running inside the dev workshop
Prerequisites
Before starting, ensure you have these requirements satisfied:
VS Code 1.90 or later installed on the host.
The UI labels and screenshots match version 0.5.2 of the Workshop extension; other versions may differ in details.
Install the extension
Install the extension from the Visual Studio Marketplace:
In VS Code, open the Extensions view by pressing Ctrl+Shift+X.
Search for
Workshopand pick the extension published by Canonical.Click Install.
Alternatively, install it from a terminal:
$ code --install-extension canonical.workshop
The extension depends on Remote - SSH, which VS Code installs alongside it. Once installed, a Workshop icon appears in the Activity Bar, opening the Workshops view.
Note
The extension talks to the workshopd daemon on the host. If the Workshops view says that Workshop doesn’t appear to be installed or running, see Troubleshoot the extension.
Create a project and a workshop
Start with a small Go program in a fresh directory;
Go itself isn’t needed on the host,
as the workshop provides it.
Create hello-workshop/ with two files:
package main

import (
     "fmt"
     "net/http"
     "runtime"
)

func main() {
     http.HandleFunc("/", func(w http.ResponseWriter, r *http.Request) {
             fmt.Fprintf(w, "Hello from %s\n", runtime.Version())
     })
     fmt.Println("Listening on http://localhost:8080")
     if err := http.ListenAndServe(":8080", nil); err != nil {
             fmt.Println(err)
     }
}
module hello

go 1.27
Open the directory in VS Code, for example with code hello-workshop from a terminal, then click the Workshop icon in the Activity Bar. The project has no workshops yet, so the Workshops view offers to create one:
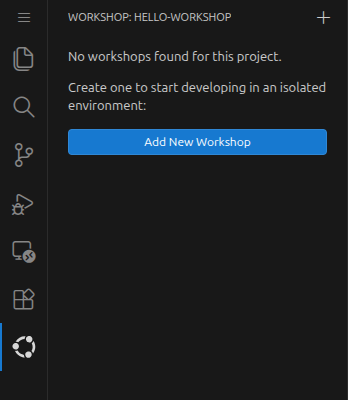
The Workshops view for a project without workshops
Click Add New Workshop and follow the wizard:
In Select SDKs, tick
goand press Enter. The list shows the reference SDKs published by Canonical, grouped by category; the info button next to an SDK opens its repository.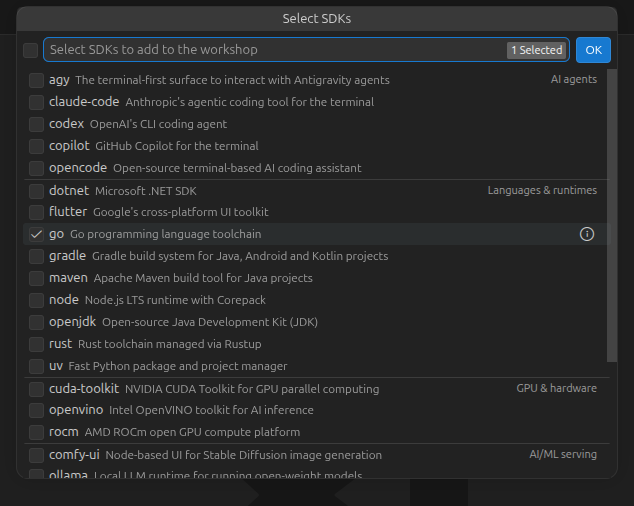
Selecting the
goSDK¶In Select a base, keep
ubuntu@24.04, marked as the default, and press Enter.In Enter a name, keep
devand press Enter.
The wizard runs workshop init for you, opens the resulting definition in the editor, and offers to reopen the window in the new workshop:
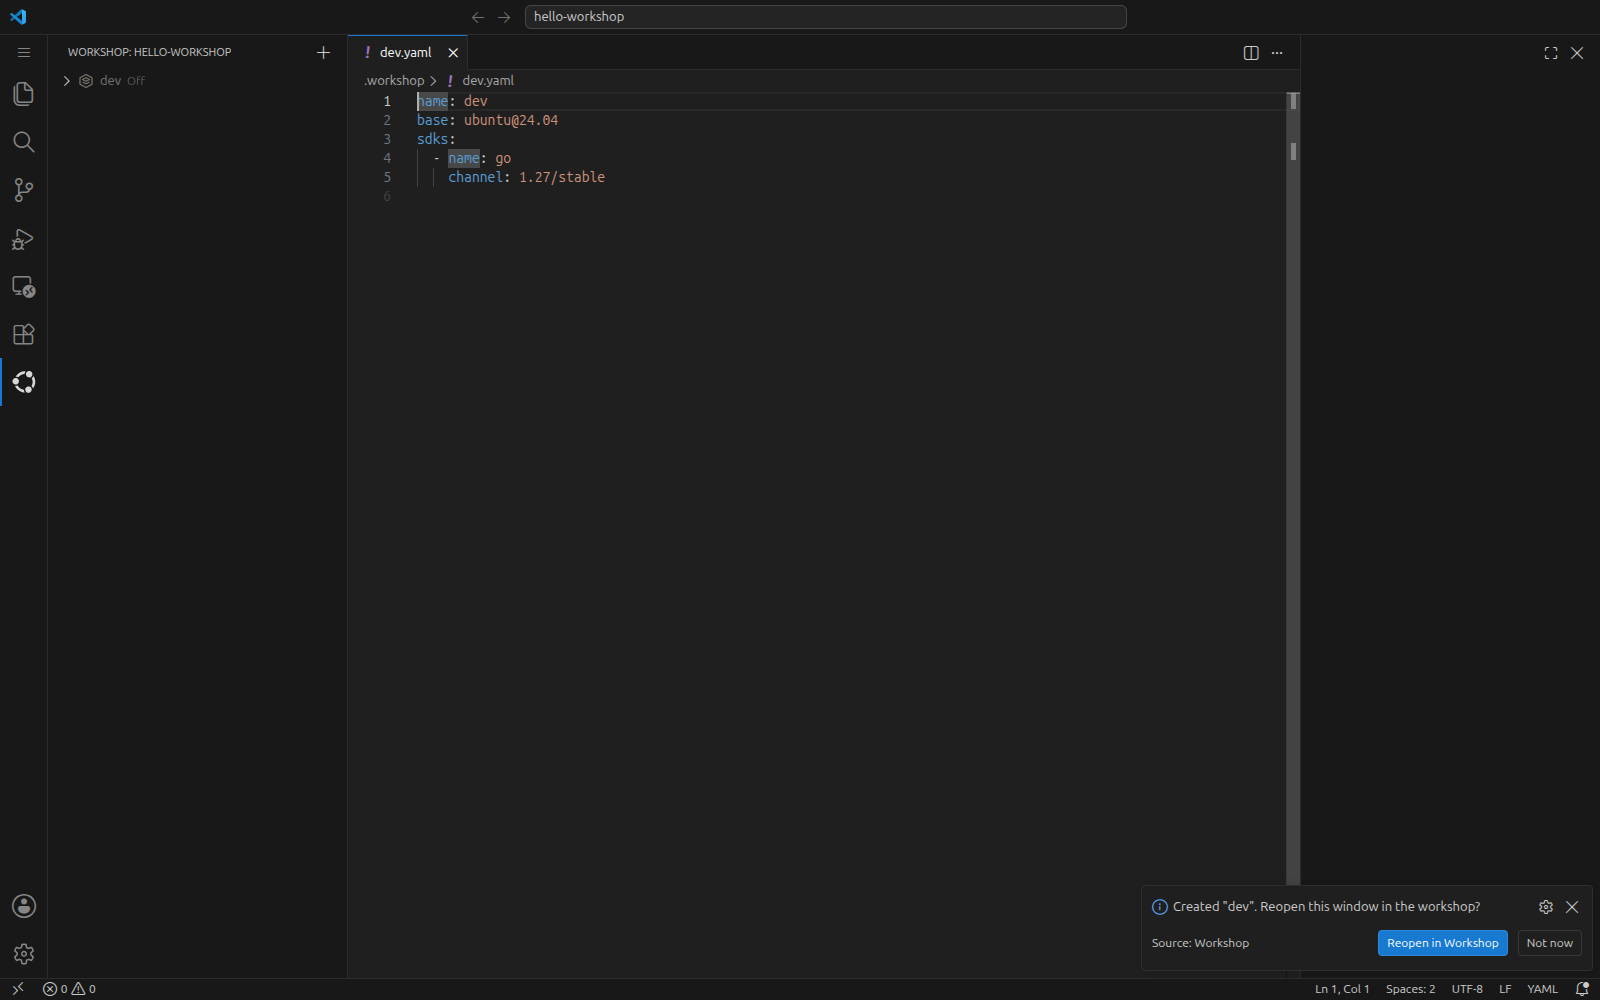
The definition created by the wizard
The definition lives in .workshop/dev.yaml
and pins the SDK to the channel the wizard recommends:
name: dev
base: ubuntu@24.04
sdks:
  - name: go
    channel: 1.27/stable
Keep the notification open; the next step uses it.
Note
The wizard lists only the reference SDKs published by Canonical. To use any other SDK, add it to the definition by hand, as shown in Change the definition and refresh the workshop.
Reopen the project in the workshop
Click Reopen in Workshop in the notification.
If you dismissed it,
hover over the dev row in the Workshops view
and click the Reopen in Workshop button that appears:
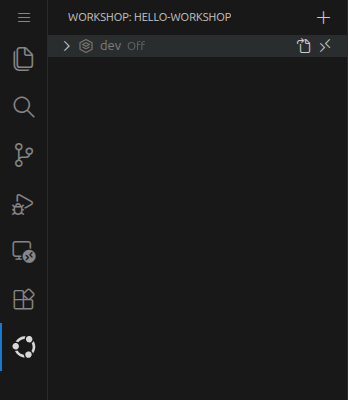
The dev workshop before its first launch
The workshop is only defined at this point, so the extension launches it first: it creates the container from the base image, installs the SDK, and reports the progress in a notification.

Launch progress
When the workshop is ready, VS Code reconnects the same window to it over SSH. The window is inside the workshop when:
the remote indicator in the bottom-left corner reads
SSH: dev.hello-workshop.wp, the workshop’s hostname;the Explorer shows the project under
/project, where the workshop mounts your project directory;the
devrow in the Workshops view turns green.
The next time you reopen the project in the workshop, the extension skips the launch: it starts a stopped workshop or connects to a running one directly.
Note
Workshop sets up SSH access to workshops on its own.
It configures the OpenSSH client on your local machine
and maintains a certificate authority
that signs an SSH host certificate for every workshop’s SSH server
and a user certificate authenticating you as the workshop user.
Connecting to a workshop by its hostname
needs no key management, passwords, or host-key prompts.
Run the code in the workshop
Open the integrated terminal with Ctrl+`; it runs inside the workshop. Confirm where you are and that Go is available:
workshop@dev:/project$ hostname

  dev
workshop@dev:/project$ go version

  go version go1.27.1 linux/amd64
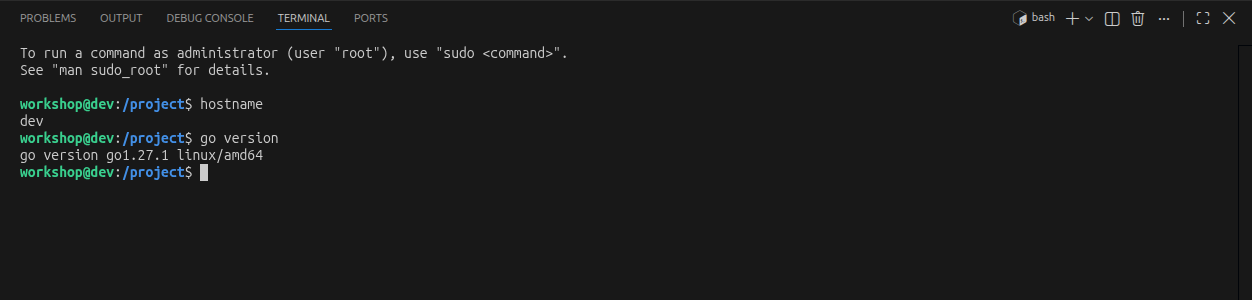
The integrated terminal runs in the workshop
Then run the program:
workshop@dev:/project$ go run hello.go

  Listening on http://localhost:8080
The server listens inside the workshop, but Remote - SSH forwards the port to the host automatically and offers to open it in your browser. Visit http://localhost:8080 on the host to see the greeting from the workshop’s Go runtime. Press Ctrl+C in the terminal to stop the server.
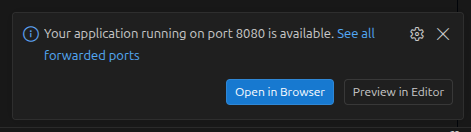
Remote - SSH forwarding port 8080
Explore the Workshops view
Expand the dev row to see what the workshop is made of:
its base, its hostname,
and its SDKs with the channel and version of each.
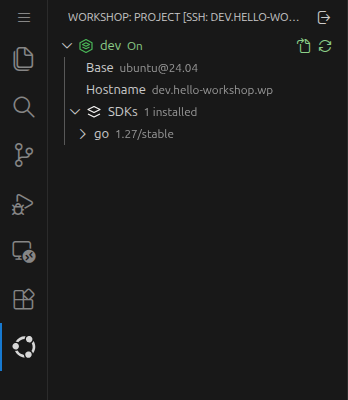
Details of a running workshop
Hovering over the row reveals its actions:
Open Definition File opens
.workshop/dev.yaml.Refresh and Reopen applies definition changes; see Change the definition and refresh the workshop.
Turn Off…, in the row’s context menu, removes the workshop container after a confirmation; see Switch between the host and the workshop.
If the view ever looks out of date, run Workshop: Refresh Workshops from the Command Palette to re-read the workshop list from the daemon.
Change the definition and refresh the workshop
Workshops are built from their definitions,
so adding a tool means editing the definition
and refreshing the workshop.
Hover over the dev row,
click Open Definition File,
and add the uv SDK for Python tooling:
name: dev
base: ubuntu@24.04
sdks:
  - name: go
    channel: 1.27/stable
  - name: uv
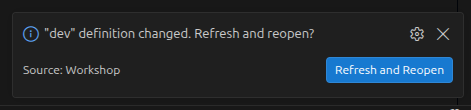
As soon as you save the file, the extension notices the change and offers to apply it:
The definition change prompt
Click Refresh and Reopen. A workshop can’t refresh itself from the inside, so the window first returns to the project on the host, then refreshes the workshop and reopens it when the refresh completes:

Refresh progress
Back inside the workshop, confirm the new SDK in the integrated terminal:
workshop@dev:/project$ uv --version
The reported version follows the SDK’s current default channel because the definition doesn’t pin one.
Note
The extension only offers to refresh workshops that have been launched before. For a workshop that’s still only a definition, Reopen in Workshop launches it with the current definition instead.
Recover from a broken definition
A definition can fail to apply,
for example because of a misspelled SDK name.
To see how the extension handles that,
open .workshop/dev.yaml again
and change the SDK name to goo,
then click Refresh and Reopen in the prompt.
The window returns to the host as before,
but this time the daemon rejects the definition
before making any change to the workshop.
The extension opens the definition
next to a read-only dev (error) log
that carries the daemon’s reason,
so you can fix the definition without leaving the editor:

A rejected definition and the reason for the rejection
Restore the SDK name, save, and accept the prompt again.
An error can also occur halfway through a refresh,
for example when an SDK’s setup hook fails.
In that case the refresh pauses instead of failing,
leaving the workshop in the Waiting state,
and the extension asks how to proceed:

A paused refresh
Reopen and Debug reopens the window in the paused workshop, where you can investigate with the integrated terminal.
Abort reverts the refresh and brings the workshop back to its previous state.
While the refresh is paused,
the dev row offers Continue Refresh
to retry from the failed task after you’ve fixed the cause,
and Abort Refresh to revert.
The extension refreshes in the --wait-on-error mode of
workshop refresh.
Switch between the host and the workshop
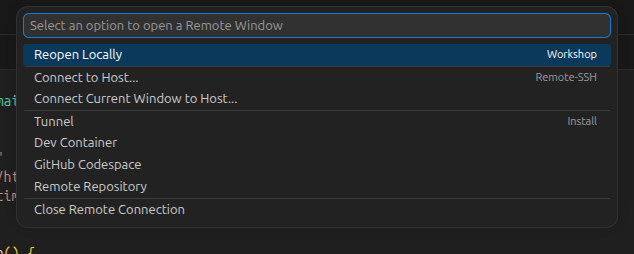
To use tools installed only on the host, or to edit the definition while the workshop is being rebuilt, return to the host: click the remote indicator in the bottom-left corner and choose Reopen Locally:
Reopen Locally in the remote indicator menu
The same command is available as the Reopen Locally button in the Workshops view title and as Workshop: Reopen Locally in the Command Palette. The window reopens the project directory on the host; the workshop keeps running.
To go back,
click Reopen in Workshop on the dev row.
The workshop is already running,
so the window reconnects within seconds.
To free the container’s resources,
right-click the dev row
and choose Turn Off….
After a confirmation,
this removes the container
together with any data stored in its default bind mounts;
your project directory on the host is not affected.
The definition stays,
so the next Reopen in Workshop launches the workshop afresh.

The Turn Off confirmation
Note
You can also connect without the extension. Find the workshop’s hostname with workshop info dev and use it with Remote - SSH’s own Remote-SSH: Connect to Host… command.
Match actions to commands
Workshop lifecycle operations in the Workshops view use the same workshopd daemon as the workshop command, so the workshop’s state is also visible from a terminal. Editor-only actions operate on the VS Code window or its files instead:
Action |
Command-line equivalent |
|---|---|
Add New Workshop |
workshop init, run by the wizard itself; the exact command line appears in the Workshop output channel |
Reopen in Workshop |
workshop launch for a workshop that was never launched, workshop start for a stopped one, then an SSH connection to the workshop’s hostname |
Refresh and Reopen |
workshop refresh --wait-on-error, then the SSH connection again |
Continue Refresh, Abort Refresh |
workshop refresh --continue or workshop refresh --abort |
Turn Off… |
workshop remove |
The expanded row |
workshop info |
Reopen Locally, Open Definition File |
No equivalent; these only act on the VS Code window |
Troubleshoot the extension
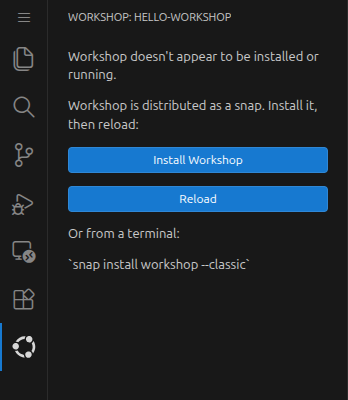
- The Workshops view says Workshop isn’t installed or running
The extension can’t reach the workshopd daemon:
The Workshops view without a reachable daemon
Make sure workshop list works in a terminal on the host, then click Reload. If the command fails as well, see How to troubleshoot Workshop.
- The Workshops view says the installed Workshop is too old
The extension requires Workshop 0.9.5 or later. Upgrade with sudo snap refresh workshop and click Reload.
- The Workshops view is empty in Restricted Mode
VS Code disables most extensions, including this one, in folders you haven’t trusted. Either trust the folder, or allow the extension in untrusted workspaces by adding the following to your user settings:
settings.json¶{ "extensions.supportUntrustedWorkspaces": { "canonical.workshop": { "supported": true } } }
- The Workshop output shows diagnostic information
The Workshop channel of the Output panel (View > Output) records extension diagnostics, including the exact workshop init command the wizard runs and reported errors. Progress for other operations appears in notifications or task-specific error log views.
See also
Explanation:
How-to guides:
Reference:
Tutorial: